Follow Me On Social Media!

Little Debbie Christmas Tree Cakes: Indulge in Homemade Joy
Introduction to Little Debbie Christmas Tree Cakes
Every holiday season, the allure of Little Debbie Christmas Tree Cakes captivates sweet lovers, igniting nostalgia and excitement alike. Imagine walking down the aisles of your local grocery store, catching a glimpse of those iconic green boxes trimmed with festive cheer. The moment you unwrap one of these charming cakes, you’re transported back to cherished childhood memories of snowy days, family gatherings, and festive celebrations. Whether used as party treats or secret snack stashes, these delightful cakes add a sprinkle of magic to any holiday occasion.
Why are Little Debbie Christmas Tree Cakes the ultimate holiday indulgence? The answer lies in their whimsical design and delectable flavor profile. Shaped like a Christmas tree and cloaked in a flavorful green icing, these cakes boast hidden layers of rich chocolate cake and creamy filling, creating a texture that’s soft and satisfying. They not only look festive but also taste like a sweet hug on a wintry evening.
Perfect for sharing, these charming cakes come in convenient, individually wrapped portions, making them ideal for holiday gatherings or surprise gifts for friends and family. Plus, they easily fit into children’s lunch boxes or serve as an after-school snack, reinforcing the spirit of giving and joy during the holidays.
The festive packaging, combined with the nostalgic flavors, makes Little Debbie Christmas Tree Cakes a time-honored tradition that resonates with many. They’re more than just cakes; they’re a reminder of the warmth, togetherness, and fun that the holiday season brings. So, if you’re looking to recreate that beloved indulgence in your kitchen, stick around for our delightful recipe that captures the essence of these iconic treats. After all, what better way to celebrate than by baking up a batch of your own festive creations?
What Makes Little Debbie Christmas Tree Cakes Perfect for the Holidays?
- Festive Design: Shaped like a Christmas tree and beautifully decorated.
- Deliciously Decadent: Layers of chocolate cake paired with creamy filling create an irresistible flavor combination.
- Nostalgic Appeal: Reminds us of our childhood holiday experiences.
- Convenient: Individually wrapped for easy sharing or snacking on the go.
With these delightful features, it’s no wonder that Little Debbie Christmas Tree Cakes remain a seasonal favorite for many!
Key Ingredients for Little Debbie Christmas Tree Cakes
Creating Little Debbie Christmas Tree Cakes at home is like wrapping yourself in a warm blanket of nostalgia during the holiday season. Each bite transports you back to childhood, and selecting the right ingredients is crucial for achieving that iconic flavor and texture.
-
Cake Mix: Start with a high-quality vanilla cake mix. It serves as the foundation of your cakes, giving them that light and fluffy texture. If you’re feeling adventurous, opt for a yellow cake mix for a richer flavor.
-
Butter: Unsalted butter is essential in this recipe. Melted butter not only adds richness but also helps the cakes rise beautifully. It beautifully complements the sweet icing on top.
-
Eggs: Using large eggs will ensure a delightful moisture level while providing structure to each cake. They’re a critical component for that fluffy consistency we all know and love.
-
Milk: Whole milk will enhance the cake’s flavor and create a moist crumb. You can substitute with almond or soy milk if you’re looking for a dairy-free option.
-
Icing: The star of Little Debbie Christmas Tree Cakes is undoubtedly the icing! A simple blend of powdered sugar, vanilla extract, and milk will recreate that signature sweet topping.
-
Sprinkles: Festive green and red sprinkles are not just for decoration; they elevate the holiday spirit in each cake.
Each ingredient comes together to capture the festive essence of the season, making Little Debbie Christmas Tree Cakes a delightful treat for holiday gatherings.
Why You’ll Love These Little Debbie Christmas Tree Cakes
There’s something magical about Little Debbie Christmas Tree Cakes that transports you back to your childhood with every bite. Picture this: it’s December, snowflakes are gently falling, and the scent of cinnamon and pine fills the air. These delightful little treats perfectly encapsulate that holiday spirit, making them an instant favorite for anyone who enjoys a festive snack.
Whimsical Appearance
First things first, these cakes are adorable. With their vibrant green frosting and charming tree shape, Little Debbie Christmas Tree Cakes brighten up any dessert table. They’re not just tasty; they’re also visually appealing, making them a delightful addition to holiday celebrations.
Nostalgic Flavor
The combination of vanilla cake and rich cream filling tends to evoke warm and fuzzy memories. Many of us associate these cakes with family gatherings, making them more than just a dessert—they’re a cherished part of our holiday traditions.
Perfect for Sharing
Not only are these cakes perfect for sharing with family and friends, but individually wrapped portions make for the ideal grab-and-go snack. During the hustle and bustle of the holiday season, these treats are a convenient option that doesn’t compromise on sweetness.
A Simple Treat
With straightforward preparation, making Little Debbie Christmas Tree Cakes is an enjoyable experience for bakers of all levels. Whether you whip these up for a cozy night in or as a fun activity with the kids, the joy they bring is unmatched.
Dive into the festive spirit with this delightful recipe, and you’ll soon find that these little cakes are a holiday tradition worth sharing!
Variations on Little Debbie Christmas Tree Cakes
Creating Little Debbie Christmas Tree Cakes at home opens the door to delightful variations that can excite your holiday gatherings or simply satisfy your sweet tooth. Whether you want to put a unique spin on the classic treats or cater to different dietary preferences, options abound.
Flavor Twists
- Peppermint Surprise: Add crushed peppermint candies to the frosting for a refreshing holiday twist. This turns the cake into a festive delight, perfect for lifting holiday spirits!
- Chocolate Drizzle: Swap out vanilla frosting for chocolate, or mix the two, and finish with a chocolate drizzle. This rich variation will satisfy any chocoholic.
Gluten-Free and Vegan Options
- Gluten-Free Cakes: Replace all-purpose flour with a gluten-free blend. This ensures that everyone can enjoy a taste of nostalgia during the festive season.
- Vegan Cakes: Substitute eggs with flaxseed meal and use dairy-free milk along with a plant-based frosting. This way, everyone can partake in the festive fun, regardless of dietary choices!
Experimenting with these variations can make your Little Debbie Christmas Tree Cakes even more special, creating sweet memories that last well beyond the holidays.
Cooking Tips and Notes for Perfect Little Debbie Christmas Tree Cakes
Creating Little Debbie Christmas Tree Cakes at home is not just about following a recipe—it’s an exciting journey into holiday nostalgia. Picture the joy of decorating a green tree cake that mirrors your favorite childhood treat, bringing back the vibrant memories of festive seasons past.
Selecting the Right Ingredients
-
Cake Mix: Opt for a high-quality vanilla cake mix to ensure a light and airy texture. If you’re feeling adventurous, a lemon-flavored mix can add a delightful twist!
-
Frosting: For that authentic Little Debbie taste, use cream cheese or vanilla frosting. You can even tint your frosting green to replicate the classic look—just a few drops of food coloring will do the trick.
-
Decorations: Get creative with your edible decorations! Small candies, sprinkles, or even coconut can resemble snow for a festive touch.
Perfecting the Baking Process
-
Pan Preparation: Always grease your cake pans thoroughly and line them with parchment paper. This ensures your cakes come out easily and retain their shape.
-
Temperature: Allow your ingredients to come to room temperature before mixing. This helps the batter combine seamlessly, resulting in a smoother cake.
Assembly and Decoration
-
Layering: When stacking your cakes, ensure they’re completely cooled. This prevents melting or sliding and keeps your cakes looking nice and neat.
-
Frosting Technique: For a classic finish, spread a thin layer of frosting first (often called a crumb coat) to trap any loose crumbs, then add the final decorative layer.
By following these thoughtful tips and incorporating your personal flair, your Little Debbie Christmas Tree Cakes will be the highlight of any holiday gathering! Remember, it’s all about having fun and making delicious memories.
Serving Suggestions for Little Debbie Christmas Tree Cakes
There’s something truly magical about enjoying Little Debbie Christmas Tree Cakes, especially when the holiday season rolls around. These delightful treats evoke memories of childhood, embodying the taste of nostalgia with each bite. While these cakes are delicious on their own, you can enhance your experience with some fun serving suggestions.
Dress Up Your Cakes
- Add a Dusting of Powdered Sugar: Just a light sprinkle can give your cakes a snowy appearance, making them feel even more festive.
- Pair with Ice Cream: A scoop of vanilla or peppermint ice cream adds a creamy contrast, perfect for warm gatherings.
Create a Dessert Platter
Arrange slices of your Little Debbie Christmas Tree Cakes on a festive platter alongside other holiday delights, like cookies or fruit. This presentation not only looks inviting but encourages sharing, enhancing the joy of togetherness during the holidays.
Festive Drinks to Complement
Serve your cakes with hot cocoa, spiced cider, or a festive cocktail. The rich flavors will perfectly complement the sweet, creamy texture of the tree cakes, creating a delightful flavor harmony.
With these serving suggestions, your Little Debbie Christmas Tree Cakes will shine brighter at any holiday gathering, making every bite a little piece of joy.
Time Breakdown for Little Debbie Christmas Tree Cakes
Creating Little Debbie Christmas Tree Cakes at home is a delightful journey filled with sweet nostalgia. This festive treat captures the essence of holiday cheer, and knowing how to manage your time will make the process even more enjoyable.
Preparation Time
Getting ready to whip up these cakes takes about 20 minutes. This includes gathering your ingredients and crafting the cake batter. Taking a little time upfront to measure and prep will pay off when it comes to baking.
Baking Time
Once your batter is ready to go, bake the cakes for approximately 30 minutes. Keep an eye on them—every oven is different! You’ll know they’re done when they spring back lightly to the touch.
Total Time
From start to finish, making your Little Debbie Christmas Tree Cakes will take about 1 hour. This means you can savor holiday memories with your loved ones, all while enjoying the delicious smell of freshly baked cakes wafting through your kitchen.
Nutritional Facts for Little Debbie Christmas Tree Cakes
As you whip up your own Little Debbie Christmas Tree Cakes, it’s good to have a handy reference for the nutritional profile of this delightful treat. Understanding what’s in your homemade version can help you appreciate each bite even more!
Calories
Each serving of these festive cakes contains approximately 150 calories. That’s just enough to satisfy your sweet tooth without going overboard, making them perfect for holiday gatherings.
Protein
In terms of protein, you’ll find about 1 gram per cake. While not a significant source, it adds a touch of balance alongside the cake’s sweetness.
Sodium
For those mindful of their sodium intake, these cakes have around 50 milligrams per serving. This amount is fairly moderate, allowing you to enjoy your holiday indulgence without worry.
By knowing the Little Debbie Christmas Tree Cakes nutritional facts, you can fully embrace the joy of baking and celebrating with friends and family!
FAQs about Little Debbie Christmas Tree Cakes
Little Debbie Christmas Tree Cakes are a delightful treat that many associate with holiday nostalgia, offering a sweet bite that combines cake, frosting, and festive sprinkles. You might have questions about how to maximize your enjoyment of these seasonal delights, whether you’re baking them yourself or simply indulging in a nostalgic snack. Here are some common questions and their answers:
Can I freeze Little Debbie Christmas Tree Cakes for later use?
Absolutely! Freezing Little Debbie Christmas Tree Cakes is a great way to preserve their festive flavor for future enjoyment. To do this, wrap each cake tightly in plastic wrap and place them in an airtight container. They can last in the freezer for up to three months. When you’re ready, just let them thaw in the refrigerator overnight or on the countertop for a few hours.
What can I substitute for melting wafers?
If you don’t have melting wafers on hand for coating your Little Debbie Christmas Tree Cakes, you can easily substitute them with white chocolate chips. Just melt them in a microwave-safe bowl, stirring every 30 seconds until smooth. You may want to add a teaspoon of vegetable oil to thin the mixture for easier coating.
How can I make these cakes gluten-free?
Making your Little Debbie Christmas Tree Cakes gluten-free is quite simple! You can use a 1:1 gluten-free flour blend in place of regular flour. Be sure to check that all other ingredients, including the melting wafers, are gluten-free as well. This way, everyone can enjoy these festive treats without worry!
Whether you’re freezing them for later, swapping ingredients out, or making them gluten-free, Little Debbie Christmas Tree Cakes can suit your festive needs. Enjoy the holiday spirit while indulging in these charming confections!
Conclusion on Little Debbie Christmas Tree Cakes
In wrapping up our journey with Little Debbie Christmas Tree Cakes, it’s clear that these delightful treats go beyond just a holiday snack; they spark joyful memories and a sense of nostalgia. Whether you’re sharing them with family at festive gatherings or sneaking them as a sweet indulgence after a long day, they bring a smile to every occasion. The bright colors and delicious flavors also inspire creativity—consider using them as a fun centerpiece or crumbling them into a dessert bar. As you dive into making these cakes from scratch, remember that they embody the magic of the season—sweet, shared moments that linger long after the last bite.
Print
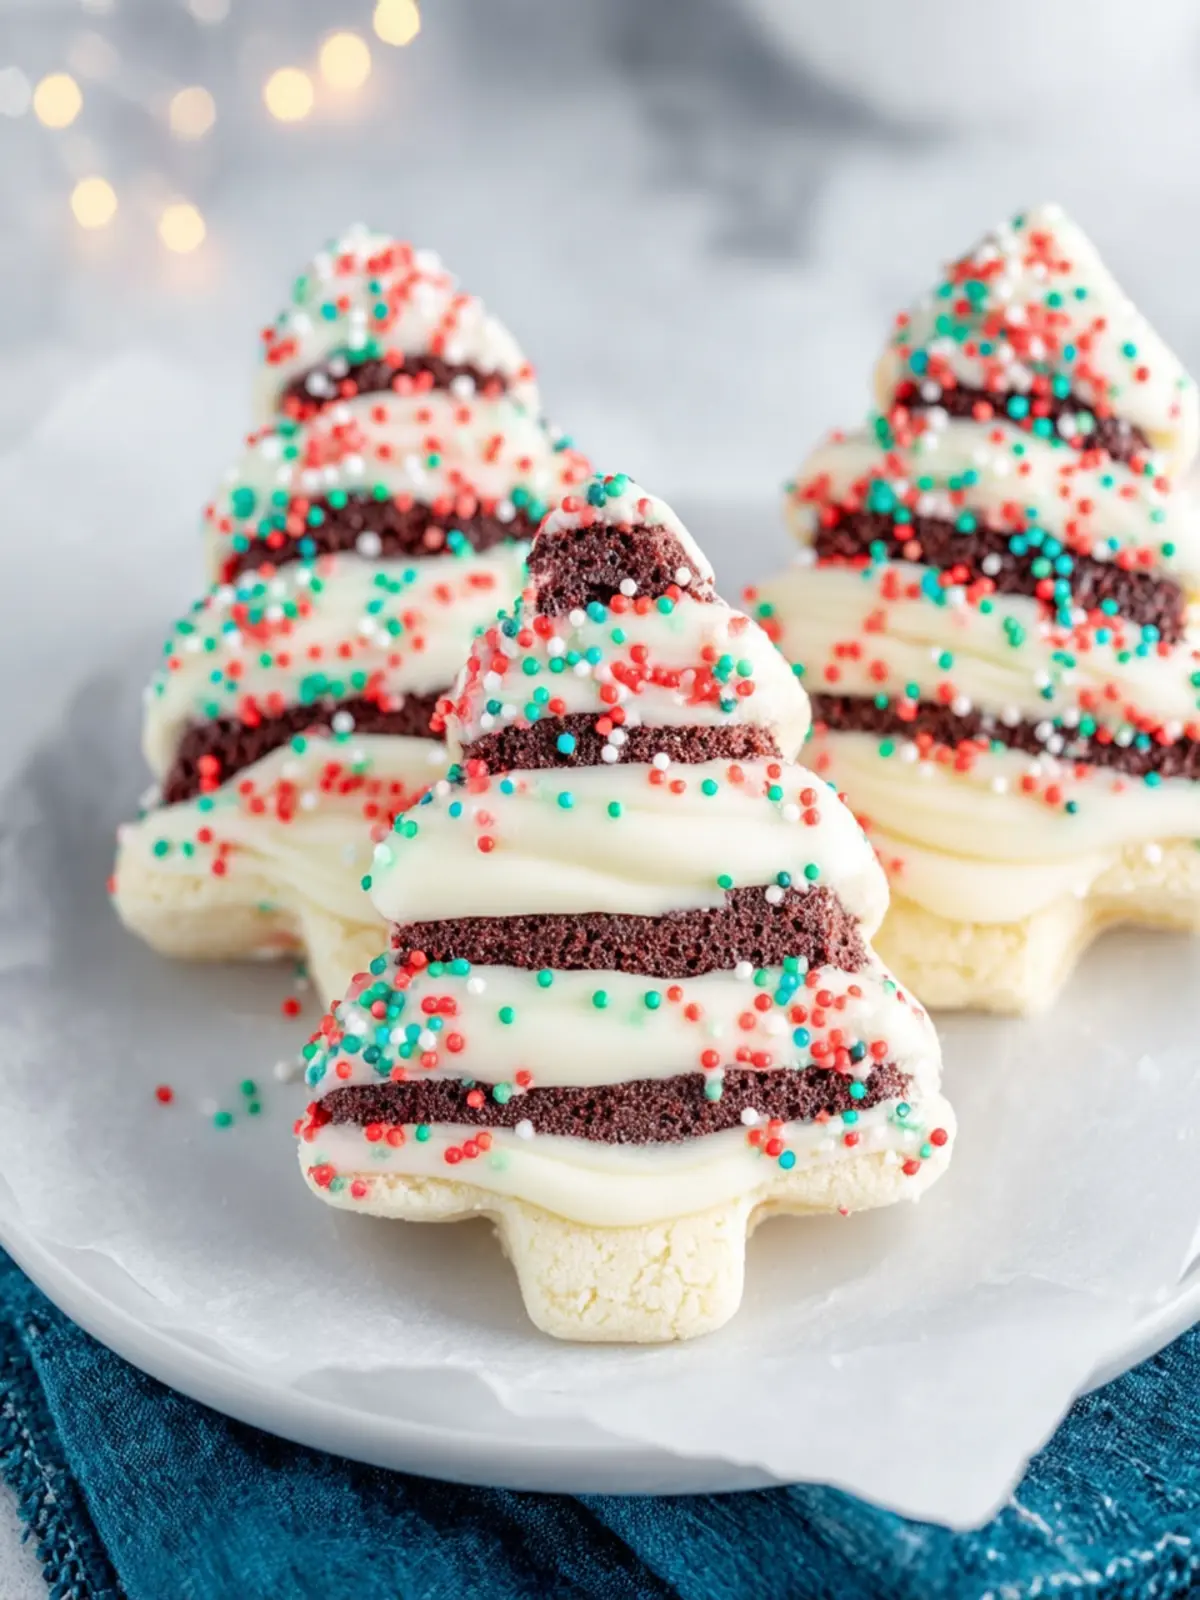
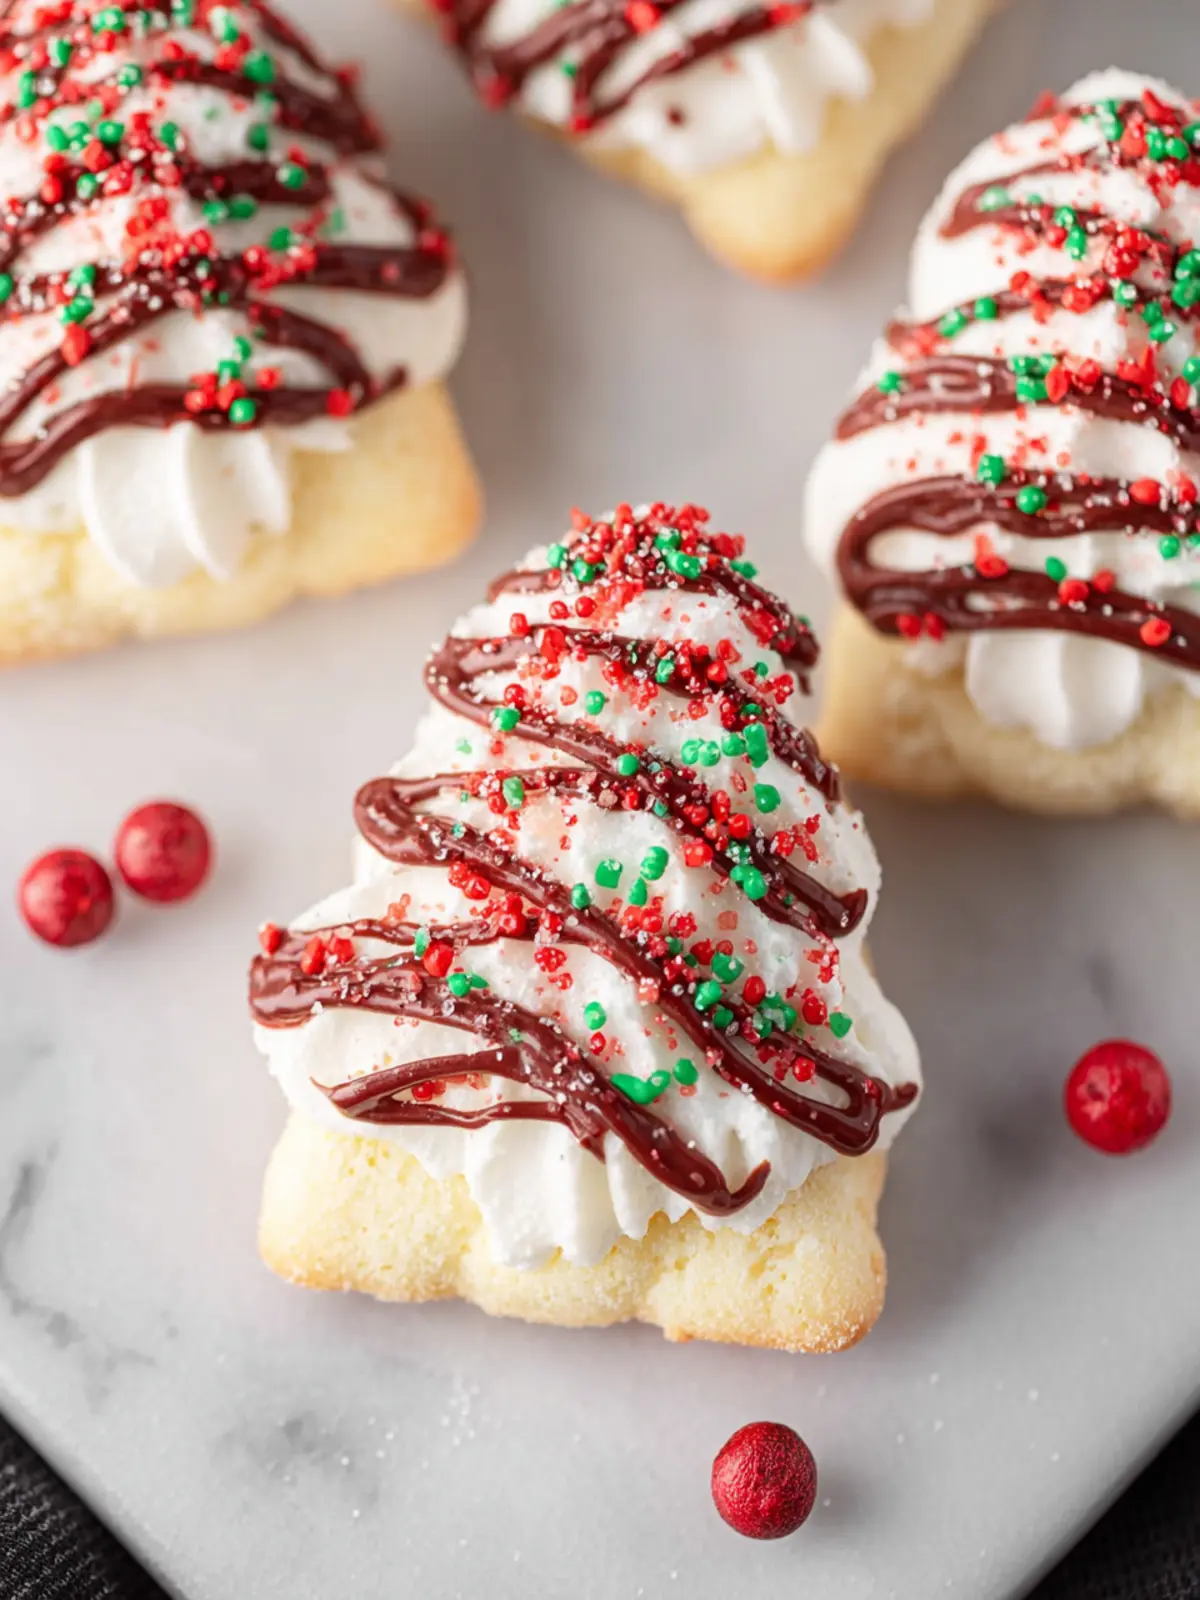
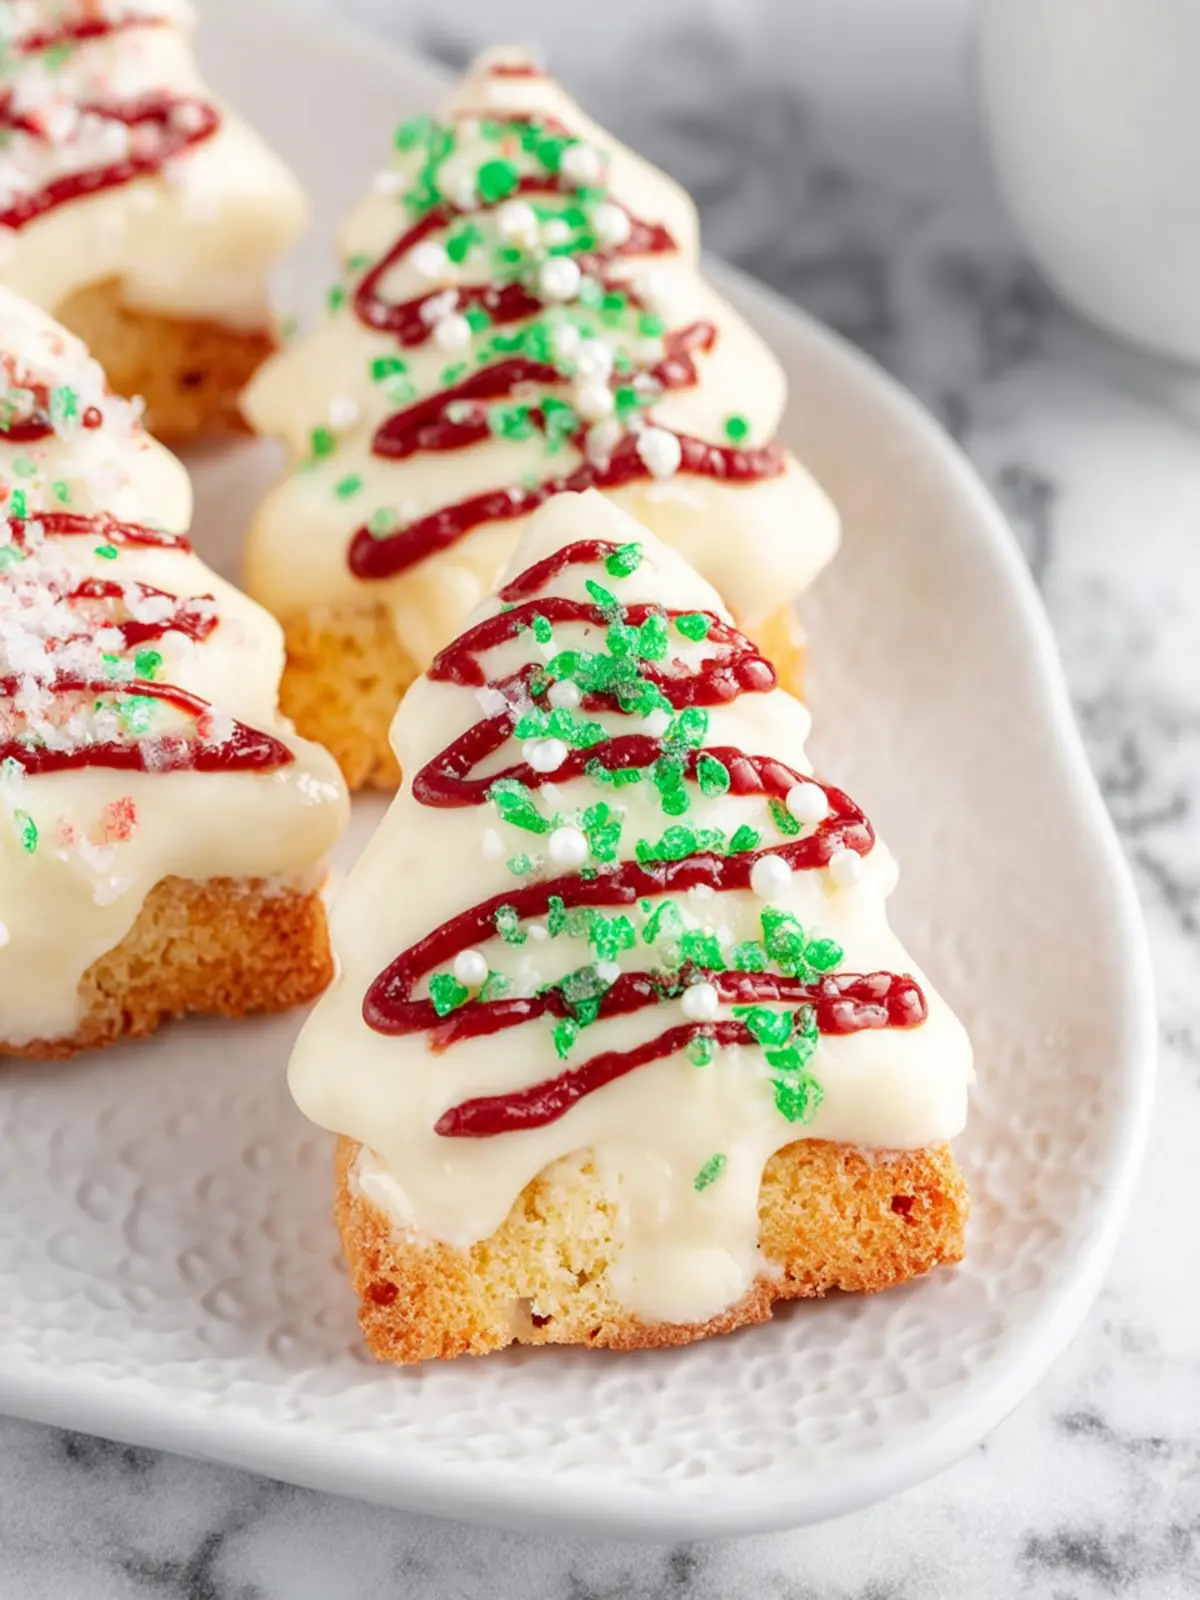
Christmas Tree Cake Sandwiches
- Total Time: 1 hour
- Yield: 8 servings 1x
- Diet: vegetarian
Description
Delicious Christmas tree shaped cake sandwiches coated with chocolate and decorated with sprinkles and icing.
Ingredients
Scale
- 1 white cake box mix
- 4 large egg whites
- 1 cup granulated sugar
- 1/4 teaspoon salt
- 1 1/2 cups unsalted butter (3 room temperature sticks)
- 1 1/2 teaspoon pure vanilla extract
- 24 ounces vanilla melting wafers
- green sanding sprinkles
- red cookie/cake icing (should be in a bag with attached piping tip)
Instructions
- Preheat the oven to 350 degrees. Grease a large rimmed baking sheet with non-stick spray and line it with parchment paper.
- Prepare the cake batter according to the box’s baking instructions and pour it into the prepared pan. Use a spatula to smooth over the top and even out the batter as much as possible.
- Bake for 15-20 minutes, or until a toothpick inserted in the center comes back clean.
- Allow the cake to cool for 5 minutes in the pan. Use a butter knife or offset spatula to release the edges, then flip the cake onto a wire rack to cool completely. Be sure to carefully remove the layer of parchment paper.
- While you wait for the cake to cool, prepare the Swiss Meringue Buttercream.
- Once cool, use a 3-4” Christmas tree cookie cutter to gently cut out as many trees from the cake as possible. Keep in mind you’ll need two of the cut outs per cake.
- Put an inch of water in a medium saucepan and bring to a gentle boil. In the bowl of your stand mixer, stir egg whites, sugar, and salt until combined.
- Place a mixing bowl over the saucepan but be careful not to let the water touch the bottom of the mixing bowl. Stir with a spatula until the sugar dissolves and reaches a temp of 160 F, about 5 minutes.
- Remove mixing bowl from heat and add to a stand mixer with whisk attachment. Whisk on medium high speed until stiff peaks form. They will be glossy. This can take up to 10 minutes.
- Reduce the speed to low and add 1 to 2 tablespoons of butter at a time making sure to mix in thoroughly after each addition. When butter is incorporated, add vanilla extract and beat on low until incorporated then frost or refrigerate until ready to frost.
- Set a wire rack over a rimmed baking sheet. Spread about 2-3 tablespoons of buttercream on 8 of the cut out trees, then top with remaining 8 trees to create 8 cake sandwiches. Place sandwiches on the wire rack.
- Melt the candy wafers according to package instructions. If you’d like a shinier look or the wafers need a little help smoothing out, add a tablespoon or two of coconut oil.
- Pour the melted chocolate coating evenly over the cakes, recollecting excess coating and redistributing if necessary.
- Sprinkle each cake with green sanding sprinkles, then place them in the refrigerator to chill for 30 minutes.
- Remove the cakes from the fridge and drizzle the red decorating icing over the tops to create a garland pattern.
- Let the cakes set at room temperature for an hour, then serve! Store cakes in an airtight container for up to 5 days.
Notes
- This recipe can be adjusted for different cookie cutter shapes.
- Make sure to let the cake cool completely before cutting.
- Prep Time: 20 minutes
- Cook Time: 20 minutes
- Category: Dessert
- Method: baking
- Cuisine: American
Nutrition
- Serving Size: 1 sandwich
- Calories: 300
- Sugar: 20g
- Sodium: 150mg
- Fat: 15g
- Saturated Fat: 9g
- Unsaturated Fat: 3g
- Trans Fat: 0g
- Carbohydrates: 36g
- Fiber: 1g
- Protein: 3g
- Cholesterol: 40mg